Day 7 - ⚡️ Quick - Pixel Coverage Calculations

Article / 08 May 2026

How to measure wasted UV space, and why it matters for alpha textures.

While writing a batch optimization script, I kept running into the same pattern. An asset with an alpha channel would have everything packed into a single material to save draw calls — but in practice, we were loading a full 2048×2048px albedo and alpha texture just to use 20% of it for the actual alpha-test pixels. With shaders you can split the work: an opaque shader handles the solid parts, an alpha-tested shader handles only the cutouts. But the texture itself still needs to be addressed.

The better approach is to pack the alpha parts separately into their own texture set and material. If there's very little alpha-tested geometry on an asset, you can potentially discard those polygons entirely over distance and skip the alpha texture sample altogether. And when memory gets tight, lower mips on alpha-tested materials degrade aggressively, blurring out detail fast.

The question is: how do you measure that waste, and what do you do about it?

Pixel Coverage

Capturing the alpha pixels that cover an asset tells us the number, or percentage, of pixels that are "wasted" within the UV shells or the texture overall.

By calculating the extent of the alpha texture actually used, we can make an informed decision: should the alpha cut or alpha blend mesh parts be packed separately, rather than loading a full 2K texture for a fraction of the content?

The Trade-off

Yes, separating the alpha parts into their own texture incurs an additional draw call and a unique shader. But the trade-offs work in your favor:

  • Lower LODs — the additional cost can be stripped from any LOD below the first, where alpha complexity rarely matters
  • Reuse — a small, generic alpha map can be shared across the project with a minimal memory footprint
  • Better quality — with a dedicated map, you can often increase the resolution of just that texture, improving alpha blend quality and mipmapping without the cost of upgrading the full 2K
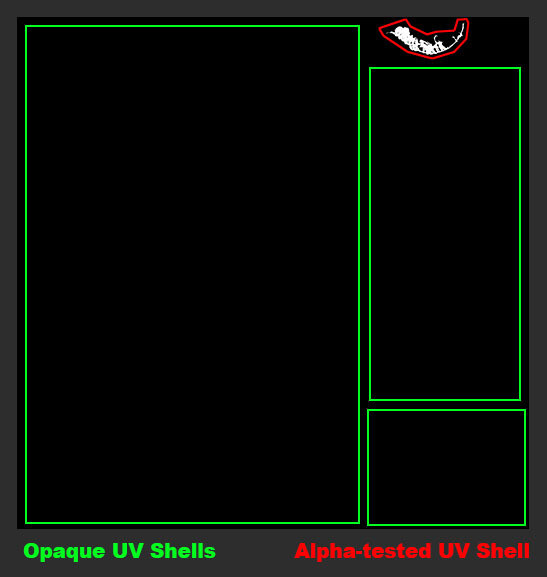
Example: An alpha cutout here occupies less than 15% of its texture — meaning most of what gets loaded is unused. The red outline indicates a UV shell. Within that shell, the formula above counts exactly how many pixels are actually used for alpha testing.
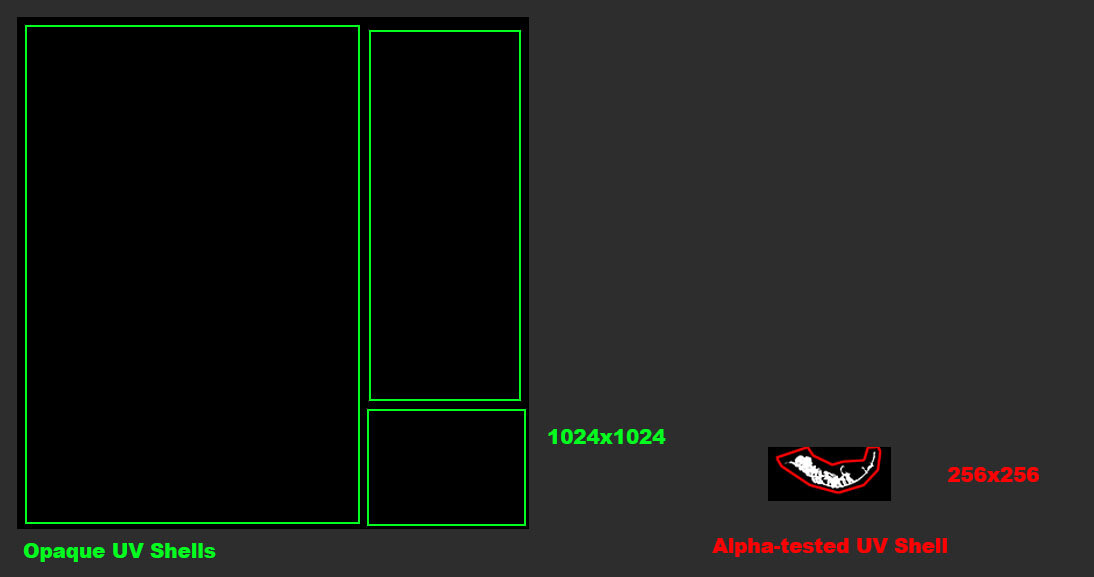
Ideal setup.

Formula

This function computes the UV coverage of a mesh; the fraction of texture space that is actually occupied by UV shells.

def CalculateUVCoverage(inMesh):
    areas = GetUVSurfaceAreas(inMesh)
    coverage = sum(areas)
    return coverage

A value close to 1 means the UV space is well packed. A value close to 0 means most of the texture is empty — wasted texel budget.

From there, I can go a step further and measure what fraction of those UV-covered pixels are actually doing alpha work. The key is to mask the opacity map against the UV shells first — if you use the opacity map directly, any padding or dilation bleeds outside the shells and returns a false result.

areas = GetUVSurfaceAreas(inMesh)    # 2D mask: white = UV shell, black = empty
opacity = LoadImage(inAlpha)          # opacity map: black = opaque, white = transparent
masked = areas * (1 - opacity)        # invert opacity so opaque pixels become 1, then mask to UV shells
alpha_coverage = sum(masked) / sum(areas)  # fraction of shell pixels actually used for alpha

In Practice

Is it always worth it? Maybe not for every asset. But collecting this data across a project is valuable — it reveals patterns, flags waste, and gives you something concrete to learn from going into the next project.

Run CalculateUVCoverage on any alpha-using asset during your pipeline validation pass. Flag anything below a coverage threshold (I use 30% as a starting point) and evaluate whether the alpha geometry is worth splitting into its own dedicated map. A small texture at the right resolution beats a large texture you're barely using.

New solutions are emerging for this problem too. Opacity Micromaps draw triangles based on your opacity map, reducing overdraw and simplifying ray-tracing meshes at the geometry level. It may be a while before these make their way into your engine, but it's worth keeping an eye on.

© 2026 Stefan Groenewoud — All views are my own, not those of my employer.

Day 6 - 🛠️ Behind the process - Approaching Material Creation

General / 07 May 2026

How I Approach Material Creation

How to approach material creation depends on whether it’s for personal work or a professional setting.

Personal vs. Professional

The goal shifts completely depending on context. For personal work, you’re trying to demonstrate your range and knowledge — you get to choose the subject matter, push yourself into unfamiliar territory, and show what you’re capable of. For professional work, the asset needs to serve the project first. If I’ve never worked on organic materials and want to explore them, a sci-fi corridor game is not the place to try it for the first time.

How Briefs Come In

I’ve worked from all kinds of starting points. Sometimes it’s a clear-cut piece of concept art with well-defined shapes, values, and a material breakdown already implied. Other times it’s a real-world reference that needs to be pushed toward the project’s visual language. The hardest and slowest is when the brief is open to interpretation. Multiple iterations, trying to translate someone else’s vision onto the canvas, until you land somewhere that feels right. If you can reduce ambiguity early, do it.

Starting Point: Alignment and Reference

On a professional project, my first step is always to align with the art director on their vision for the asset, prop, or environment piece. I don’t start building anything until that conversation has happened.

From there: gather a large pool of reference images. More than you think you need. Bring them to art direction and start culling: decide what stays, what goes, and what elements you’re specifically trying to hit. Reference isn’t decoration; it’s your contract with the team about what the final thing should feel like.

Art Direction

There is some unknown territory depending on whether you are the first artist on a project or joining one that already has a defined look. If you join an arena shooter that has existed for five years, you know that is the style you have to match - your job is to fit into an established system, not reinterpret it in your own way. Look-dev is mostly the time on a new project when a material artist and the art director will try to define the art style together and produce benchmark assets that set the example for the rest of production. In practice that means matching existing roughness ranges, staying within the established palette, and using the same base tiling rates as surrounding assets. The creative challenge shifts from "what should this look like" to "how do I get there within these rules."

For a personal project you are the art director, so you will have to figure out what look you're going for. That can be building toward a specific game company you'd love to work for, or simply setting yourself a new challenge.

I've never had to fully redo a material, but there have been moments where you have to reassess whether the direction you're heading is right for the intended look. A material can look very good in isolation, but in context it becomes too distracting. It might be a great portfolio piece on its own but it's also about striking a balance that best serves the project. That's not always easy.

Splitting It Up

Before diving in, it’s worth asking: is this one material, or a combination of materials and shading effects working together to produce the result? A wall might have a base plaster material, a damage decal layer, and a wetness mask, each is a separate concern. Getting that decomposition right early saves significant rework.

The choice usually comes down to this: a layered material approach gives you flexibility at runtime; think a slick oil layer on top of an asset that needs to shift over time, or a burn effect that sits on top of everything and is controlled by a placement mask. A single material is your typical export directly from Designer or Painter, but you need to account upfront for things like shader-driven tint, detail map blending, or any other parameters that need to be controlled at the engine level. Neither is always the right answer, it depends on how the asset will be used, how often it needs to vary, and what the shader budget allows.

The Actual Process

Set your texel density first. Figure out the tiling rate and set the real-world measurements in Substance Designer or Painter before you start building. This ensures that anything derived from your height map (normals, ambient occlusion, curvature) is physically grounded and PBR-compliant, and that your material sits consistently alongside everything else in the project at the same real-world scale.

Compartmentalize reusable features. If your project has rocks appearing across multiple surfaces — cliff faces, rubble piles, ground scatter; build a rock generator node once and share it across all materials that need it. The same goes for any recurring detail: pine needles, cracks, edge wear. You get visual consistency across the project and a single point to update when something needs to change.

Settle on a naming convention early. Your materials, resources, and shared nodes need to be findable: by you six months from now, and by whoever else is working in the same library. Whatever convention you pick, document it and stick to it.


Closing Thought

What works for one person doesn’t always translate to another’s workflow, so don’t be afraid to experiment and adapt. That said, on a professional project, you often don’t have the bandwidth to rethink your process mid-stream. Build the habits in personal work, so they’re second nature when it counts.

© 2026 Stefan Groenewoud — All views are my own, not those of my employer.

Day 5 - 💬 Take - The optimization conversation

Article / 06 May 2026

Optimization is treated as a problem-solving activity when it should be a planning activity. By the time someone raises a performance concern, the art is already built, the habits are already formed, and fixing it is expensive.

Timing Is Everything

Game development is often a balancing act; you need R&D first to figure out the style and direction of your project. I'm not saying teams should hyper-fixate on optimization at the expense of that process; that's the complete opposite of what I'm getting at. If pipelines are too early in their development, it's genuinely hard to optimize content because the foundation isn't ready yet. Shader optimizations are a good example of this. Setting up LODs, on the other hand, makes sense early in a traditional pipeline, as that work always has to be done regardless of where you are in production.

The moment optimization gets treated as something to deal with later, the cost of dealing with it compounds.

It's Rarely a Disaster, But It's Always a Tax

Contrary to what some might expect, I don't have horror stories. During each project there were challenges developing asset pipelines while tools weren't production-ready yet, which led to learning lessons along the way. That's normal. What's less normal, and worth flagging, is when performance issues get diagnosed too bluntly. Solely watching the performance graph and waiting for it to drop can give false positives. Lowering texture resolution will improve performance, but does it actually solve the underlying problem? Are you missing LODs, uncollapsed draw calls, unoptimized collision meshes? The number going up doesn't tell you that.

What It Looks Like in Practice

Some of the more concrete challenges I encountered: not having all content run through the optimized pipeline, which meant additional manual tweaks were still needed for far-distance LOD meshes. On a cross-platform title, not setting proper LOD distances early caused issues that were expensive to revisit. Skipping the first visual LOD incorrectly. And collision meshes with too many triangles, something with a real CPU cost. There was no hard limit defined for collision triangle counts; it was largely driven by artist experience and the assumption that larger on-screen assets required more accurate colliders. That's fair, but it still came at a cost that wasn't being tracked.

In my experience, most developers had a reasonable instinct around texture resolution — keeping maps at 2K, with 4K as a real exception reserved for cinematics, characters, or full-screen assets. That baseline consistency helped. The problems surfaced, on a different project, where consistency broke down across asset types: environment art with twice the texel density of characters, or assets with triple the average triangle count. The more content is authored without addressing this, the harder it becomes to course-correct later.

Conclusion

Performance matters, but it shouldn't hinder the creative process, and sometimes it does, driven by the loudest voices in the studio. Hyper-fixating on performance for performance's sake is not the way a team should approach it. It's a collaborative and iterative process that has to involve art direction, leads, and producers, so that everyone understands the constraints of the pipeline — and how scalable, or not scalable, it actually is.

This is as much a leadership problem as it is a technical one. The conversation doesn't need to be a blocker; it needs to be on the agenda.

© 2026 Stefan Groenewoud — All views are my own, not those of my employer.

Day 4 - 💬 Take - Navigating the Creative Industry

General / 05 May 2026

Navigating the Creative Industry – My Experiences

The games industry is small. People talk. And yet, somehow, the recruitment process remains one of the least transparent parts of a career in this field.

This isn’t a guide on how to write a CV or ace an interview. It’s a collection of real experiences — things that actually happened, shared because I wish someone had told me this earlier. Whether you’re a newcomer or a seasoned professional looking for a change, I hope this saves you some time, frustration, and unnecessary self-doubt.

Studio Experiences

Studio A: Silence After Interest

A recruiter at a major triple-A studio reached out, the conversations went well, and then: nothing. I sent two or three follow-up emails. No response. Not even a “we’ve gone a different direction.”

It wasn’t just frustrating. It was unprofessional. In an industry this small, a recruiter is the face of the studio. Silence communicates more than they probably intend.

Takeaway: If a studio goes quiet after expressing interest, follow up once clearly, then move on. Their silence is information. And if you end up there later, you’ll remember how they treated candidates.

Studio B: The NDA Pressure

After multiple calls with another triple-A studio, they kept pushing for work samples I couldn’t share. The project hadn’t been announced. The work was under NDA; I told them this repeatedly. Their response: ”We could have a quick call so you can just briefly show it.

Think about that. A company looking to hire trustworthy people, actively trying to get someone to breach a legal agreement. I’m certain they wouldn’t appreciate it if their own staff did the same.

Takeaway: A studio that pressures you to violate an NDA is showing you exactly how they operate. Walk away cleanly and without guilt.

Studio C: The Visa Oversight

Two interviews in. Good conversations. Then I had to chase the recruiter for a status update, only to find out they’d run into complications hiring me because of the visa process. Something they could have identified in the very first call.

Weeks of my time, and theirs, wasted on something that should have been a 5-minute check at the start.

Takeaway: Early in any process, ask directly: ”Are there any relocation, work authorisation, or visa constraints that could affect this role?” It protects everyone’s time. If a studio doesn’t have that answer upfront, that tells you something too.

Studio D: The Low-Ball Offer

A studio in a major European city extended an offer that barely covered basic living costs, let alone healthcare, in one of the most expensive cities in the world. I was more junior at the time, but the number was still disconnected from the reality of actually living there.

Takeaway: Always research cost of living against the offered salary before getting emotionally invested. Tools like Numbeo exist. Use them. Knowing your number going in puts you in a much stronger position and prevents the gut-punch of an offer that insults the city you’d be moving to.

Recruiter Experiences

Recruiter A: The Mentor Mirage

About ten or twelve years ago, I came across someone offering paid “mentor sessions” for newcomers to the industry. The pitch: guaranteed connections, 10+ years of recruitment experience, interview prep, resume polish, introductions to major studios.

When it came time to deliver on those introductions, they vanished.

It cost people money and, more importantly, time and trust during a vulnerable moment in their careers. To this day, I haven't seen this person deliver on the introductions they promised, and I haven't seen them working at any major studio since. In hindsight, there was probably more to the story than I knew at the time.

Takeaway: Vet anyone offering mentorship or career connections with the same rigour you’d apply to a job offer. Ask for specific examples. Ask who they’ve placed and where. Legitimate mentors welcome those questions.

Recruiter B: “It’s a Done Deal”

For a role at one of the largest studios in the US, the recruiter was enthusiastic to the point of being unprofessional. Phrases like ”it’s a done deal” and ”they’re lucky to have you in the process.” I went through the interviews. The team was great. Then I found out the job description didn’t actually match the role that was being filled.

Not only unprofessional; it’s a waste of the hiring team’s time and the candidate’s.

Takeaway: Treat recruiter enthusiasm as a yellow flag, not a green one. Ask direct, specific questions about the role’s responsibilities, team size, and reporting structure before investing in multiple interview rounds.

What I’ve Learned Overall

The recruitment process in games asks a lot of you: your time, your portfolio, your emotional energy. Not every studio or recruiter treats that investment with the respect it deserves.

A few things that have helped me:

  • Communicate your constraints early. Visa status, location, availability, salary expectations: raise these in the first conversation. It’s not impolite, it’s efficient.
  • Set your boundaries. It's okay to say no, or to step away from a process if something feels off.
  • Your NDA is not negotiable. Any studio worth working for will understand this immediately.
  • A recruiter’s enthusiasm is not an offer. Verify everything in writing.
  • Research the studio independently. Glassdoor, LinkedIn, people in your network who’ve worked there. The small industry works both ways; information travels.
  • Silence after engagement is an answer. Don’t chase indefinitely. One clear follow-up, then redirect your energy.

The industry is small. Your reputation matters, and so does theirs. Don’t be afraid to hold studios and recruiters to the same standard they hold you.

© 2026 Stefan Groenewoud — All views are my own, not those of my employer.

Day 3 - 🔬 Deep dive - Occluder Meshes

Article / 04 May 2026

Occluder Meshes

A companion to Shadow Proxies — another manual mesh optimization technique that helps the engine discard work it doesn't need to do.

Purpose

As shaders become more complex and heavier, optimization becomes more important. If a shader doesn't write to the depth pass, it won't contribute to the pre-pass that culls unnecessary pixels further down the pipeline.

Systems like backface culling (which discards triangles facing away from the camera) or occlusion culling middleware like Umbra handle some of this automatically, but they don't take care of the pixel shader cost for geometry that's technically "in view" but hidden behind something else.

By creating a custom occluder mesh that writes to the depth buffer, you're helping the Z-prepass cull pixels that are definitely not visible from a given angle. The key constraint: all triangles of the occluder mesh must stay within the bounds of the visual mesh. If the occluder extends beyond the visual geometry, it will incorrectly kill pixel shader information behind it, causing rendering artifacts where visible pixels get culled.

Maximum draw distance is also worth considering. If an occluder mesh is too aggressive at large distances, it can cause issues due to reduced vertex precision over distance; depth buffers become less precise at far ranges because of how depth is distributed non-linearly (more precision near the camera, less far away). An overly tight occluder at distance can start incorrectly culling pixels that should be visible.

Rule of thumb: I tend to target walls or props that cover most of a character's body, or roughly 10–15% of the screen, at least for third-person games. Anything smaller and the occluder drawcall costs more than it saves.

Engine Support

Unreal Engine does support custom occluder meshes. In UE4 and UE5, you can enable Software Occlusion Culling and mark specific simplified meshes as occluders. UE5 also handles much of this automatically through Nanite's software rasterizer for opaque geometry, but for non-Nanite assets and translucent materials, custom occluders remain relevant.

Note: not all engines support this level of per-asset control. Some proprietary engines expose it explicitly, others handle occlusion at a higher level with less artist input.

When It Helps

  • Large opaque props that block a meaningful portion of the screen.
  • Interior walls, pillars, architectural elements in dense scenes.
  • Non-Nanite assets in a UE5 pipeline.

When It Doesn't

  • Small props: the occluder drawcall will cost more than it saves.
  • Translucent or alpha-blended geometry: these don't write to depth and can't act as occluders.
  • Nanite-enabled opaque geometry in UE5: Nanite handles this automatically.

© 2026 Stefan Groenewoud — All views are my own, not those of my employer.

Day 2 - ⚡️ Quick - Backface vs Occlusion Culling

Article / 01 May 2026

Backface Culling vs Occlusion Culling — What's the Difference?

Front-/Backface culling is done at the hardware level; the GPU determines the winding order of a triangle (clockwise vs. counter-clockwise relative to the camera). If it's back-facing, the triangle is discarded before the pixel shader runs.

There are cases where you'll need to disable it, for example two-sided materials like foliage cards, thin fabric, or leaves need both faces to be visible, and transparent geometry such as glass often requires interior faces to render correctly, so the volume reads right. Fast, cheap, and on by default for opaque geometry.

Occlusion culling happens at a higher level, before draw calls are even submitted. It determines whether an object is hidden behind something else; if it is, the engine won't queue the draw call at all. This works well for opaque assets.

Alpha-tested and alpha-blended materials are trickier: because they don't fully write to the depth buffer, they can't reliably act as occluders themselves. Some engines handle the occlusion pass automatically with tools like Umbra, or through built-in Software Occlusion Culling like UE. But you can also manually help the engine by creating custom occluder meshes, which is what tomorrow's post covers.

Key difference: backface culling happens at the triangle level and removes back-facing triangles. Occlusion culling happens at the object/draw call level and skips rendering hidden assets entirely.

© 2026 Stefan Groenewoud — All views are my own, not those of my employer.

Day 1 - 🔬 Deep dive - Shadow Proxies

Article / 30 April 2026

Shadow LODs were a manual optimization technique for reducing shadow rendering cost. With modern rendering tech like Nanite and Micromesh, they're largely obsolete, but not entirely.

Back in the day

When I just entered the industry I only played around with Visual LODs, which was already challenging enough at times if you had to manually generate them. Any normal, UV or vertex inconsistencies were quite noticeable, and not all studios used automated tools. So for some of the games that I worked on, we manually reduced meshes inside Maya, and then did manual tweaks to polish. Nowadays, we have fancy tools like Simplygon or default to using Nanite-like techniques.

The Old Problem

First, we had offline baking processes that would take care of the heavy lifting. In preparation for that, you needed UVs on your mesh, and then generate a secondary UV set that was a complete unique layout for lightmap generation. Problem: every time an asset changed or if you updated the Time of Day, you had to rebake the level; slow and tedious as you can imagine! The industry responded on two fronts: light probes (storing irradiance as spherical harmonics coefficients) let dynamic objects receive indirect lighting without triggering a full rebake, and the shift to deferred rendering separated the geometry and lighting passes, enabling more dynamic lights without a proportional performance cost.

The more complex and dense assets became, as games increased in scale (more open world games), and the more dynamic worlds have to become, the harder it is to solely rely on the visual LOD also affecting the shadow maps and/or shadow cascades. The shadow depth pass has to evaluate every triangle in a mesh — or worse, every pixel for alpha cutouts, and that cost adds up fast. The solution was a shadow proxy: strip away the visual shader entirely and substitute a separate, ultra-simplified mesh used only for shadow casting, while the full-detail mesh handles visible rendering.

Great example from CryEngine where they demonstrate the reduction from 10k triangles to just 1k triangles. Visually the difference is barely noticeable to the naked eye but performance-wise it will have an impact.

You don't need normal or albedo information in a shadow proxy shader. If you require displacement or alpha-testing for your visual shader, you'll want to integrate those into your shadow proxy shader too, for parity. From an organizational and performance point of view, you want to separate your opaque vs. alpha-tested materials, keeping the number of alpha-tested triangles/pixels to a minimum and not drawing them for the entire mesh if you don't have to.

For visual LODs you can swap out different simplified meshes at predefined draw distance thresholds; the same can be done for shadow proxies. Having a reduced shadow proxy at far distances will also help reduce load on shadow memory. Note: the visual mesh threshold doesn't need to match the shadow proxy threshold. For example, a shadow proxy can draw at a maximum distance of 200 metres while the last visual LOD draws at 500 metres. Shadows at just a few pixels may not be noticeable, but the visual representation still is.

To sum up:

  • Use a custom proxy mesh that only writes to the shadow cascades
  • Assign a dedicated shadow proxy shader; strip any information that isn't needed in this stage of the pipeline
  • Set custom draw distances independent of your visual LOD thresholds

Limitations

The statement "no longer necessary with Nanite" is the right instinct, but it's only fully true for opaque Nanite geometry. Foliage and Characters still remain challenged by custom shadow proxies.
Shadow Physics Asset still useful for Characters. While Foliage needs an alpha-tested fallback option.

How It Worked in Unreal Engine & Proprietary

UE3 / UE4 / Others:

You could assign a simplified static mesh exclusively for shadow casting in a few ways:

  • A dedicated low-poly mesh component with rendering disabled and shadow casting enabled, using a convex hull or box mesh casting the shadow instead of the real geometry
  • For alpha-heavy assets (foliage, fences, chains), this eliminated the expensive per-pixel shadow depth evaluation on alpha cutout materials
  • Per-LOD shadow control: disable shadow casting on lower LODs entirely, or force a simpler shadow representation per LOD level

UE5 / Nanite:

Nanite handles shadow depth passes through its own rasterizer with automatic LOD, which largely removes the need to hand-author shadow proxies for high-poly opaque meshes.

However, Nanite doesn't fully support alpha masked geometry. Alpha-heavy assets still fall back to traditional shadow rendering, which means the proxy technique remains relevant for:

  • Foliage with alpha cutouts
  • Fences, railings, chains, cables
  • Any non-Nanite mesh in a Nanite pipeline

Practical Takeaway

If your project uses Nanite for hero assets, shadow LODs are off your plate for those. But keep the proxy approach in your toolkit for anything with alpha transparency or anything outside the Nanite pipeline. A box mesh shadow proxy on a dense foliage card cluster is still a meaningful win.

© 2026 Stefan Groenewoud — All views are my own, not those of my employer.

Day 0 - 💬 Announcement post - why I'm doing this, what to expect

Article / 29 April 2026

I'm Back — And This Time I'm Actually Going to Post

It's been a while since I've written anything here. Longer than I'd like to admit.

Coming back to the blog is partly an exercise in figuring out where I want to go next in my career: what areas of tech-art I still want to explore, what I've learned that's worth sharing, and honestly, what I still don't fully understand yet. Writing has always been a good way for me to work that out.

The other reason is simpler: my old approach wasn't working. Some of my posts took several evenings to get through: writing, rewriting, proofreading, trying to make everything perfect before hitting publish. It was too slow and too draining to keep up. I'd rather post something good every day than something perfect every six months.

So this is an experiment. For the next 60 working days, I'm going to post something every weekday. The posts will vary: deep dives, quick breakdowns, behind-the-process writeups, opinions, experiments. Some will be long. Some will be short. Not all of them will be great, and that's fine.

If it gains traction, great. If not, I'll still have sharpened my writing, figured out which formats actually suit me, and gotten a lot of ideas out of my head and into the world.

Let's see how it goes.

© 2026 Stefan Groenewoud — All views are my own, not those of my employer.


Refining Performant Levels of Detail (LOD)

General / 25 May 2025

Welcome back to the second part of our discussion on Level of Detail meshes! This blog post will be slightly shorter as it primarily builds upon the concepts introduced in the first post. In the first draft, we focused on calculating the LOD based on the diameter of an object. However, since the player in a game would see the mesh from various angles, it’s crucial to consider all viewpoints, not just one. 

Additionally, as someone pointed out in the comment section, this process assumes absolute values. To ensure your values are positive, simply wrap an Abs() function around them.

For instance, if we encounter assets from different angles, such as full frontal, full side view, or full top view, depending on their positioning and rotation by the artist, we shouldn’t only use one angle (the diagonal) for calculation. By taking into account all angles, we can give thin or flat objects a more realistic chance of being accurately measured. We collect all these values and calculate the mean as the input value. 

In hindsight, it might be better to use the maximum of all angles. If the difference between the smallest and largest number is too large, the LODs will fade out too quickly.

In an ideal setup, if the assets are placed and scaled, whether it’s larger or smaller, or if the field of view is wide or small, the game engine should compensate for these factors accordingly.


pseudo code


diagonal = ∛(0.075² + 0.157² + 0.167²) = 0.387m
front = ∛(0.075² + 0.157²)  = 0.312m
side = ∛(0.157² + 0.167²)  = 0.375m
top = ∛(0.075² + 0.167²)  = 0.322m


mean = ((diagonal + front + side + top) / 4)  = 0.349m


CalculateDistance(inSize=mean, inScreenSpacePercentage=100, inFovDegrees=45.0, inVerticalResolution=1080):
   ratio = inVerticalResolution / 1080 # compensate for 4k or FullHD screens
   # distance to see the asset, top to bottom
   distance_to_object = (inSize * 0.5) / (tan(inFovDegrees * 0.5))
   distance_by_screensize = distance_to_object * 100 / inScreenSpacePercentage
   max_distance = distance_by_screensize * ratio
   return max_distance


Horizon Forbidden West: Automated Asset Conversion And Updating

General / 06 March 2025

This postmortem analysis delves into my approach to swiftly converting a substantial amount of assets. Picture this scenario: when transitioning from Horizon Zero Dawn, the initial game, to its sequel, Horizon Forbidden West, we encountered the task of updating the game’s asset-art (props and environment-art models) to reflect the latest technological advancements and ensure compliance with the technical specifications. Moreover, we had to replace the assigned shaders with novel ones specifically designed for Horizon Forbidden West. The sequel would leverage existing assets while introducing new ones. Consequently, some of these scripts and pipelines were reusable. Given the sheer number of assets we wanted to display on screen, we prioritized optimizing their setup to stay within the memory budgets while maintaining the visual fidelity of the first game, supporting an approximately 7-year-old platform (PS4) and the (at the time) newly released PS5.

Step-by-step

  • Asset Management: Collected, tagged, and tracked over 5000 assets in a local database, highlighting the importance of testing and validating changes.
  • Texture Optimization: Optimized textures by discarding unnecessary maps, converting PSDs to PNGs, and ensuring consistency in materials like rock and stone.
  • Conversion Process: Utilized the Substance Automation Toolkit API and a shared Python library for texture conversion, ensuring PBR compliance and compatibility with the engine.
  • Maya: Executed Maya batch script, providing information and updating shaders, and relinking textures.
  • Export: Exported assets to the engine and linked to a test level for evaluation purposes.
  • Evaluating: Evaluated GPU performance, export/conversion issues, and internal tools/settings in-game.

I initiated the process by collecting all assets that required updating through a script. This step allowed me to assess the scope of the undertaking. I tagged and tracked each asset in my local database (a JSON file) with the appropriate process, the Maya file associated with that asset, all the textures linked to the asset, and some other data that I can’t quite remember right now.

Side note:

However, it’s important to mention that this approach wasn’t entirely foolproof and a one-size-fits-all solution. With over 5,000 files touched, all of which were linked to levels, sets, cinematics, or prefabs, the process became even more fragile and complicated, particularly during production when everyone was striving to complete the game. Coordinating the initiative poses a challenge, emphasizing the significance of allocating sufficient time for testing and validating the changes. To address this, it’s crucial to split the changes into smaller check-ins.

Let’s continue!

While updating the files, I took the liberty of optimizing content whenever possible. I discarded any Specular maps that weren’t necessary for dielectrics or any other unnecessary maps. Determining the need for dedicated Specular channels could be challenging, especially since not everything was authored using PBR techniques. Relying solely on Python libraries and image processing wasn’t always sufficient. Additionally, I converted all PSDs to PNGs to significantly enhance Perforce syncing times, image processing, and DDS exporting times.

In addition to texture optimization, we also had to identify assets that required recoloring treatment. For instance, if an asset contained rock or stone materials, we wanted to ensure that it (visually and color-wise) matched the other rocks by applying the same coloring treatment. In most cases, I was able to quickly generate a mask for other assets through a manual process. I could either extract it from the PSD layers, bake out the UV layout and use that, or simply mask in Photoshop and have that linked during the Substance file generation process.

Conversion

To begin the texture conversion process, I utilized the Substance Automation Toolkit API. Certain aspects of this process were defined in a shared Python library that I had written for it. This library is explained in more detail in another blog post titled “Texturing for Rocks.” This shared graph would clamp the Color values to be more PBR compliant, clamp the Roughness ranges due to the engine shading model, and run the AO through a Curve node to compensate for some manually authored AO that was too dark.

Why the Substance Automation Toolkit? Creating a new file using the API is a straightforward process. It’s easy to replicate, and we can open the Substance file in Designer and export it if necessary. Batch exporting is also an option if any changes are made to the shared Substance graph.

Maya

The next step was to update the textures linked in the engine and reexport the DDS’s. This was accomplished using the internally created library, which resulted in a relatively fast process.

Initially, I attempted to use a headless Maya version, but this approach did not work because the viewport renderer did not initialize the shaders and shader-defined information required for evaluation and update. As a slower alternative, I opted to run regular Maya in a batch process. In this process, I provided Maya with a list of information per Maya scene and updated the shaders. Upon loading, I retained the old variables in memory, updated the shader, and then updated the variables accordingly, compensating for any differences, such as variable names or ratios, like tiling for detail maps. Finally, I relinked the textures to the shader once more, ensuring they were correctly associated with the mesh.

From there, the assets were exported to the engine. Unfortunately, I cannot provide further details due to the proprietary nature of the engine.

Once the assets were exported, I was able to link them to my test level, enabling me to evaluate the performance (GPU) in-game and assess any issues that may have arisen during export or the conversion process. Before checking in, I conducted a quick test process to ensure everything was working as expected. I used our internal tools and double-checked if none of the previously set settings or draw distances were broken. The further into development you are, the more vital this becomes.

Conclusion

The way I present the steps in my explanation is also how the process functioned in Python. Evaluating images using PIL was the quickest step, while Maya posed the most significant challenge. Re-exporting assets from Maya was the slowest and most prone to crashes. Multiprocessing consumed so much memory that I experienced several blue screens. It was a valuable learning experience, as I learned how to automate certain steps and refine the Python code to be more compatible in different scenarios rather than a one-time use solution. However, it became apparent that full automation for this process was too risky due to the many odd cases and asset setups that had to be validated by eye. 

The ideations and iterations that emerged from these processes, served and continue to serve as the foundation for more automated and/or procedurally driven processes.

A special thanks to Chris Thompson for proofreading and to Guerrilla for allowing me to publish and share this information.